Drovers new Rig - "Big Mal"
- Thread starter Drover
- Start date
Install the app
You are using an out of date browser. It may not display this or other websites correctly.
You should upgrade or use an alternative browser.
You should upgrade or use an alternative browser.
0730 this morning, portable is powering really well...9yr old Aldi job with the Epever mppt certainly gets the job done...

Last edited:
Actually must have been getting some input from roof as well, the maths don't work for a 120w panel.....should have shut down the roof to get a good indication but it's what happens daily... more interested in the actual not what could...
The door to the Thundercan House has been leaking when it rains, only a little bit so I thought I would get in early, its a Thetford D3 door, knew I was in for some fun as I pushed one nylon hinge pin out easily not so the 2nd one as the end snapped off, so left it alone and made something to support the door in the open position .............
Thetford in their wisdom designed the door in 3 pieces which once clicked together doesn't come apart, so the Google wisdom says, mines 13 yrs old so I thought probably due for replacement anyway so may as well do a voyage of discovery, I managed to dismantle it, the inner frame is held in by metal clips which once in place hang on to the inner and outer frame, a very sharp and thin scrapper sorted it out............ ONce in peices the outer panel, styro insulation and innner wooden panel showed that the leak had been there for a very long time, the inside panel was well sealed so the water filled up the cavity and slowly soaked the inner wooden panel. and possibly drained out the way it had entered by the outside panel ........... The outer panel frame shows a channel which would hold a large O ring type seal but none had ever been in place so the panel had to seal by pressure from the inner insulation, red dust and water stains showed it tried valiantly with a high tide mark half way up the door ....................... Cleaned up, a bead of silicon in place of O ring, fitted outer panel and held in place till it set then new insulation and inner panel fitted with the inner frame forced in place into its original metal clips with a bit of silastic and a new door seal fitted to round things off ...............................
Since its been there for a long time I may have missed the signs so contemplating pulling out the dunny and see how the floor is, all good underneath as I check the floor under wet places regularly but do I really want to go there ...??????????
Be why I have seen so many with a big bead of silicon around the door panel .....
Possibly all caused by "too much thunder"??? Ha Ha Ha!!!The door to the Thundercan House has been leaking when it rains, only a little bit so I thought I would get in early, its a Thetford D3 door, knew I was in for some fun as I pushed one nylon hinge pin out easily not so the 2nd one as the end snapped off, so left it alone and made something to support the door in the open position .............
Thetford in their wisdom designed the door in 3 pieces which once clicked together doesn't come apart, so the Google wisdom says, mines 13 yrs old so I thought probably due for replacement anyway so may as well do a voyage of discovery, I managed to dismantle it, the inner frame is held in by metal clips which once in place hang on to the inner and outer frame, a very sharp and thin scrapper sorted it out............ ONce in peices the outer panel, styro insulation and innner wooden panel showed that the leak had been there for a very long time, the inside panel was well sealed so the water filled up the cavity and slowly soaked the inner wooden panel. and possibly drained out the way it had entered by the outside panel ........... The outer panel frame shows a channel which would hold a large O ring type seal but none had ever been in place so the panel had to seal by pressure from the inner insulation, red dust and water stains showed it tried valiantly with a high tide mark half way up the door ....................... Cleaned up, a bead of silicon in place of O ring, fitted outer panel and held in place till it set then new insulation and inner panel fitted with the inner frame forced in place into its original metal clips with a bit of silastic and a new door seal fitted to round things off ...............................
Since its been there for a long time I may have missed the signs so contemplating pulling out the dunny and see how the floor is, all good underneath as I check the floor under wet places regularly but do I really want to go there ...??????????
Be why I have seen so many with a big bead of silicon around the door panel .....
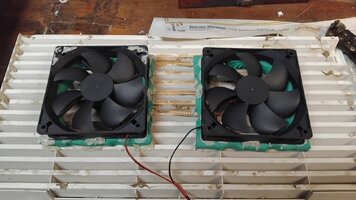
Some upgrades for Big Mal, lashed out on 4 x 120mm fans so new fan in ensuite after vent rebuild, new fans at back of fridge, went from 3 x 75mm jobs to 2 x 120mm, a couple of leds to replace the last 2 fluro unit inside which were hardly ever used, with the price of new fluro tube may as well buy a whole led light fixture, along with new door seals its all ready for a run in a few weeks again, diesel heater is working well and I have hopefully found a sealer for the rubber checka plate stone guard on front, tried all sorts of tyre protection stuff but all only lasted a month a most, this time an acrylic paint sealer, 3 weeks now, lots of rain and its still good, rubber looks like new ........................

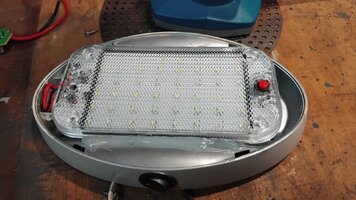
My new led lights turned up today,  , it wasn't long till I discovered something amiss in my grand plan, the size of the Led's was smaller than the old fluro light fitting andsome of the screw holes were showing along with a bit of cabling, bummer but I found a cunning plan, remove the guts of the fluro light and glue in place the Led unit with it turned ON and wired up to the original switch with original light diffuser in place, looks like the old lights but far brighter and can see much better ............... All up $20, the other fluro's in the rest of the van replaced years ago and the same fittings are now $80 each so not going there ......................... new fluro tube if you can find one is about $25-30 and no led lamp with compatable socket ............
PS: I should add even the cunning plan did have one hiccup, once I had glued the led panel in place I noticed I'd covered the holes to remount the light, another slight mod required.....................
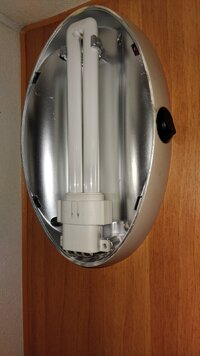 .. Original light ............................ Modified to LED ..
Job Done............................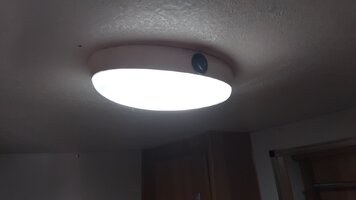
 , it wasn't long till I discovered something amiss in my grand plan, the size of the Led's was smaller than the old fluro light fitting andsome of the screw holes were showing along with a bit of cabling, bummer but I found a cunning plan, remove the guts of the fluro light and glue in place the Led unit with it turned ON and wired up to the original switch with original light diffuser in place, looks like the old lights but far brighter and can see much better ............... All up $20, the other fluro's in the rest of the van replaced years ago and the same fittings are now $80 each so not going there ......................... new fluro tube if you can find one is about $25-30 and no led lamp with compatable socket ............
PS: I should add even the cunning plan did have one hiccup, once I had glued the led panel in place I noticed I'd covered the holes to remount the light, another slight mod required.....................
 .. Original light ............................ Modified to LED ..
Job Done............................

Last edited:
Smart! no flies on the Drovers ingenuity!!My new led lights turned up today,, it wasn't long till I discovered something amiss in my grand plan, the size of the Led's was smaller than the old fluro light fitting andsome of the screw holes were showing along with a bit of cabling, bummer but I found a cunning plan, remove the guts of the fluro light and glue in place the Led unit with it turned ON and wired up to the original switch with original light diffuser in place, looks like the old lights but far brighter and can see much better ............... All up $20, the other fluro's in the rest of the van replaced years ago and the same fittings are now $80 each so not going there ......................... new fluro tube if you can find one is about $25-30 and no led lamp with compatable socket ............
PS: I should add even the cunning plan did have one hiccup, once I had glued the led panel in place I noticed I'd covered the holes to remount the light, another slight mod required.....................
View attachment 70014.. Original light ............................ Modified to LED .. View attachment 70015
Job Done............................View attachment 70016
Yes Ian @Drover, modification at its best despite the many challenges along the way. No need for the reflective surface behind the light any more and the LEDs are far brighter and use less power too. Something to be proud of indeed!!!! Great job and very neat!!My new led lights turned up today,, it wasn't long till I discovered something amiss in my grand plan, the size of the Led's was smaller than the old fluro light fitting andsome of the screw holes were showing along with a bit of cabling, bummer but I found a cunning plan, remove the guts of the fluro light and glue in place the Led unit with it turned ON and wired up to the original switch with original light diffuser in place, looks like the old lights but far brighter and can see much better ............... All up $20, the other fluro's in the rest of the van replaced years ago and the same fittings are now $80 each so not going there ......................... new fluro tube if you can find one is about $25-30 and no led lamp with compatable socket ............
PS: I should add even the cunning plan did have one hiccup, once I had glued the led panel in place I noticed I'd covered the holes to remount the light, another slight mod required.....................
View attachment 70014.. Original light ............................ Modified to LED .. View attachment 70015
Job Done............................View attachment 70016
Fellas I don't know, was more like "OH Bother" ( or words to that effect) going cheap and stuffed up again but luck on my side I got out of it, just have to hope the glue gun juice holds when summer turns up again but I do have a plan B just in case , BluTack .......................
@Drover just stop, hook up and go!! We’re in Karumba now enjoying the cold mornings and beautiful days and the Everest only went into limp mode once grrrrrrrr
The countdown has actually started 8 days till we roll, daughters for a couple of days then Meandarra to meet old mate then Toompine Pub for a feed and a beer a week laterish maybe more depends how long we stop at Quipie or maybe Eulo depends which way we go ........................ Have a rotten old Army mate swanning around up there as well, keeps sending me pics ....................
Limp modes not pleasant on tour ........................ I have my code reader and BiC tool box.
Have a good time winter could be a big one down here, may last for 10 days this year ........................
Limp modes not pleasant on tour ........................ I have my code reader and BiC tool box.
Have a good time winter could be a big one down here, may last for 10 days this year ........................
I’d pack a cardigan and a pair of socks if I were you lolThe countdown has actually started 8 days till we roll, daughters for a couple of days then Meandarra to meet old mate then Toompine Pub for a feed and a beer a week laterish maybe more depends how long we stop at Quipie or maybe Eulo depends which way we go ........................ Have a rotten old Army mate swanning around up there as well, keeps sending me pics ....................
Limp modes not pleasant on tour ........................ I have my code reader and BiC tool box.
Have a good time winter could be a big one down here, may last for 10 days this year ........................
I’d pack a cardigan and a pair of socks if I were you lol
Diesel heater working----- CHECK ........................ Tank full of diesel------------- Check ................................. Spare Jerry of diesel -----------Check......
Snow Boots, snow pants , Jacket and beany -------------- Checkety, check, check ........................ Stored in van at all times plus alarm when temp gets to double digits so safe to go outside..... and thats just for Toowoomba...
The countdown has actually started 8 days till we roll, daughters for a couple of days then Meandarra to meet old mate then Toompine Pub for a feed and a beer a week laterish maybe more depends how long we stop at Quipie or maybe Eulo depends which way we go ........................ Have a rotten old Army mate swanning around up there as well, keeps sending me pics ....................
Limp modes not pleasant on tour ........................ I have my code reader and BiC tool box.
Have a good time winter could be a big one down here, may last for 10 days this year ........................
Be keen to know what the roads are like out Quilpie way now...we were going to head out there and further West at Easter, but unfortunately Mother Nature decided right at that time to wreak havoc on the local towns! Hope the locals are getting back on their feet...
Let you know if we get that far ..................... if they aren't much chop will have to bail as The Bride has neck trauma, so rough stuff is out nowadays, she blames all the FWDing we did in the early days, probably not wrong.
Yesterday I set everything up for the grand test today, The 24hr Data/Power Use test, so this morning I fire up Starlink when I have my coffee 0530 and hook the laptop and phones to it to see how much data is used on a normal day, turn on the VAST STB and TV for a few hours in morning and of late arvo, basically see how much Starlink makes on the battery and see if it matches the paper guess work, so today we have some pretty good cloud cover, bluddy heavy, meter shows about 3a being drawn between the 3 units, panels are providing 1.5a, probably add a .5 for fridge, fans, sensors, will leave it running to see how bad things get by 1600, we usually shut everything off about 2000, such an overcast day we would be frugal with power anyway so be interesting to see the outcome, a normal day battery only needed for the hours between 1600 and 0700 basically as solar runs everything else ..................
Shut it all down at 1600, too flamin cold outside and to make matters worse as i was sorting out the how much power was made to how much used I must have pushed the wrong button and lost the data, anyway I know I had a minus but only a small amount as state was about 13.3v so just a bit less than at the start, so not bad for such an awful day, if I had run it till 2000 certainly would have been down further, most I saw coming in down the line was 2.2a but mostly 1.5v so using more than bringing in, this morning at 0600 it was showing 13.3v , think I will do it all again when no cloud around to get a better idea of normal as its really the 1600 till 0600 period when the battery gets a workout................ though it did show that the Starlink won't really be a big drain on the system but has reignited my thoughts on more storage .... The cloud cover was pretty dense, the solar skylight in house was just dull the leds were just on and the shed solar panel for the boat battery was not doing much at all.
Did work out our normal data use so unless we stream a few things the 50gb a month Starlink Mini Roam plan will be fine while away and its power use was 1.3a idle and would go to 2a when working .. The set up to line it up is magic, point it south and phone app tells you with a diagram when your spot on, a minute and all done, brilliant ...........
Did work out our normal data use so unless we stream a few things the 50gb a month Starlink Mini Roam plan will be fine while away and its power use was 1.3a idle and would go to 2a when working .. The set up to line it up is magic, point it south and phone app tells you with a diagram when your spot on, a minute and all done, brilliant ...........

